Pages

Monday 7 December 2015

December already and a Drapey Dress

So, how did it get to be December??

Last time I wrote I was all set to go to Karen's Made-up Meet Up.  I seem to remember it was warm enough for me to not wear the cowl I had knitted for my made-up pledge.  I had a lovely afternoon meeting new people and catching up with others that I had met before.

Karen about to do her video link up
Jane from JaneMakes and Gill from Vintagerockchick

I came away with a  couple of patterns and a length of chambray, which I plan to make into a tunic for Youngest.

I also came away all fired up and raring to get sewing again. I have been sewing alot, but not blogging anything, so may have a few more catching up posts!

I got the latest 'Great British Sewing Bee: Fashion with Fabric' book for my birthday in June and had just contented myself with flicking through and planning what I might make.  The garment that really appealed was the drapey dress - I really liked the version in the book, but also Karen has made a couple seen here, here and here  and also this one from Alex.  I had bought a stripey knit earlier in the year which I thought would be ideal.

I think I traced off a size small, and I cut everything out in one layer. I think I cut one piece out the wrong way, but after much deliberation and consultation on IG, I decided that the fabric didn't have a right/wrong side and just flipped it over.
One of many layouts I tried
I felt that some of the markings and seam lines didn't meet up super well, but that could easily be user error and dodgy tracing. Karen had suggest not trying to match up stripes due to the strange shapes of the pattern pieces, so I followed her advice and then ended up with stripes that matched pretty well!
Matching up centre front notches
When I tried it on to check the fit, I was suddenly very concerned that the stripe was a bit strident and that as a whole it was a bit overwhelming.  I took the sides in a little, finished it off  and left it hanging on the shelves on our landing (one of my photo spots) for sometime. I finally got round to taking some pictures and still wasn't sure about it and I am not sure Husband was super keen initially. However I wore it for a drinks party the other day and really liked it and Husband said it looked much better than he thought it would.  I think that things look completely different when being worn 'for real' rather than specifically for photos.


 The lighting is appalling, so apologies for the dodgy photos.

Other news - I finished my radiotherapy at the end of September. I have had issues with my skin due to the effects of the radiotherapy, but I think after a couple of trips to the doctor and 'time' they are resolving.  I had my consultant follow up appointment about 10 days ago and I have now been discharged from hospital care due to my 'excellent prognosis'. Hurrah!  I am now in 'patient-led care' ie I go them if them if I have a problem/need anything rather than the hospital calling me back every few months for appointments that I may not need. It is all rather a relief that it is all over, but hasn't really sunk in yet.  I am getting quite fatigued quite easily, which is frustrating, but I was told to expect this for sometime as an effect of the radiotherapy. I was due to have this follow-up appointment shortly after Christmas, so it is almost like an early present to have this news now!


Thursday 10 September 2015

All Made Up

So, after yesterdays post, I finished my Scarf!  Yesterday I needed to seam it together and weave in the ends, so I that's what I did earlier today whilst sitting in the sunshine.

The scarf is very warm - I am wearing it right now as I have been sitting in our kitchen with the french doors open and it has got a bit draughty. It is going to be deliciously cosy come winter time!

This is how I plan to be wearing it in the winter - double loop

single loop
Many thanks to Karen for hosting the Initiative and giving us all a little extra push to do stuff we may not have done otherwise! Even more kudos for having raised so much money for the National Literacy Trust.  Have you seen Karen's dress - its amazing! I am looking forward to seeing it in person on Saturday at the Made Up Meet Up. I am hoping that the weather will be nice enough for me not to need my cowl on Satuday!

I am unbelievably chuffed with this! I have never knitted anything before and now I have something that I can wear. What can I knit next???
photo-bombed by Husband (he had been gardening, hence the sartorial elegance!)

Wednesday 9 September 2015

My MadeUp pledge

Firstly of all I would like to say thank you for the kind messages I recieved after my last post.  I am feeling much more positive about things than when I last wrote. The results from the second operation came back as being all clear - in that all the tumour cells have been removed successfully.  I have now started radiotherapy, I am half way through my second week, and am finding it quite tiring and feeling a little uncomfortable. I have also started Tamoxifen, which I will be taking for the next five years, and comes with its own set of problems  - my problem seems to be a disturbed digestive system, but it takes a while for the body to get used to the drug, so I am hoping that will all settle down soon.

Anyway, back to the Made Up Initiative....

Back in August, Karen from DidyoumakeThat? teamed up with  Love Sewing magazine and launched the Made Up Initiative in support of the National Literacy Trust. Karen is a children's book editor and literacy is something close to her heart. I was lucky that I grew up devouring books and it rare that I don't have a book on the go. Fortunately Husband and I have managed to instill a love of reading in our girls (although it would be nice if two of them read something other than Harry Potter and associated fan fiction!) however many people in the UK don't have that opportunity and this is a small way to help. The idea was for crafty types to make a pledge to make something within a set time frame and at the same time make a donation to the Made Up Initiative. Initially Karen was aiming to raise £1,000 in a month, with the donations being done via a Justgiving page. At the time of writing the Initiative has raised £2500 - amazing!

Having spent a lot of time sitting around recuperating this summer, much of it spent reading, I rather randomly decided to teach myself to knit. At that point I didn't feel like sewing, but wanted to do something with all my sitting around time.  I was inspired by the Gaptastic Cowl that Amanda from Bimble and Pimble made a while back and figured that it shouldn't be that hard to do something similar. The Gaptastic Cowl is a free pattern on ravelry. So my Made Up Initiative pledge was to make the Gaptastic Cowl and finish it within the month.

I sat on the sofa armed with knitting needled that the girls had from trying to learning knitting when we were in NZ, a ball of wool left over from Husbands crocheting days and Youtube videos on how to cast on, how to knit, how to purl and to join wool. I think I did it ok...

To start with I was pretty rubbish, I just kept knitting and purling to do stockinette, I tried a bit of ribbing, I pulled it all out if it wasn't going well or I ran out of wool, I practised the moss stitch, then I felt brave enough to try with 'proper' wool. I went to my local craft shop and bought 1 skein of  Erika Knight maxi wool in Mallard. They had plenty so I thought I would just see how I got on then buy any more later. I ended up buying two more skeins. I didn't read the cowl instructions properly and bought normal needles (9mm bamboo)  not circular ones so I kind of made it up in the end.  I cast on too many stitches twice and ripped it out twice... but that just means I've got pretty good at moss stitch at the moment!  Last night I armed myself with Youtube again to learn how to cast off, which I manged successfully and today I shall seam it together to get the cowl effect. Oh, and I need to weave in the ends where I joined the wool.

Youngest doesn't think I should seam it, but I'm pretty sure I can undo the seaming if I don't like it. I am currently trying to decide whether to stitch toghter in a straight forward way or to do it as a Mobius strip. The wool is 100% British wool and the moss stitch makes the scarf lovely and squishy. It will certainly keep me warm in the winter, juding by how warm I was with it on my lap!

For reference I used this video for casting on. This lady has several basic knitting videos that were all useful.

At about the same time I decided that I would join the modern world and sign up with Instagram. I am still getting to grips with it and only have 4 lovely photos (3 of my knitting!) on there so far. I have a little icon on the side bar if you would like to see what else I get up to - I can be found @tamsinwp_pmc.

Tuesday 4 August 2015

A collection of collages and another sad summer

This is a long post, grab a cuppa, try not to fall asleep! I have noted before that my blog gets a lot more attention from me during MMM as it tends to highlight all my un-blogged makes, even with semi-regular posts I still don't seem to have caught up yet! I wanted to do individual posts for these but I seem to be running out of oomph and have other things to think about - more of that at the end. I have been sewing a lot so have quite a few things to mention here - they are in no particular order.

Self drafted trousers
I mentioned these in a post a little while ago.  In my pattern cutting class we transformed our skirt block into a trouser block. Had I written this at the time I made the trousers, there would be a lot more info on how we did this. Right now, I can't really remember! I had been desperate to learn how to make trousers to fit rather than faff about with a pattern and an assortment of alterations, but it took me a good 4 or 5 months to put my pattern into use - and this was all about a year ago. I used an interesting mystery fabric from a local charity shop - £4 for nearly 4mtrs and I think it is a wool blend. I have washed the fabric several times and the resulting trousers. The fabric shrank lengthwise a little the first time it was washed but not since, and the trousers have shrunk a little in the leg nearly every time I have washed them. They were hemmed to be the perfect length for a specific pair of shoes, but now they are a fraction short with not much hem to let down, sigh.
too big; too tight; waist ok - dodgy legs; spot on!
Eldest's dress
Eldest was keen for me to make her a dress a little while ago - she is a happy recipient of mum-made clothes. The pattern I used was Simplicity 1699 which came free with a sewing magazine I picked up one day. As noted before, Eldest is much bustier than me so I thought this would be a good dress style-wise because of the princess seams on the bodice - they would make any fit changes a bit easier. She is also quite petite so I had to shorten the bodice. I bought the fabric at Backstitch when we visited for for the shop's first birthday back in March. There is very annoyingly, a seam down the centre front, which I totally didn't take into account so there is a slightly dodgy pattern running down the skirt. Eldest and I have agreed to ignore it. A sneak peak of the dress was seen in this post. You will see that she opted for the more discrete sleeve edge. She has already asked me for another dress using the same pattern. I have cut it out and remembered to cut the skirt front on the fold!

Indecision averted
A little while ago I was berating myself for being indecisive when it came to choosing a pattern for a dress for me. I ended up making the BurdaStyle dress which I had had my eye on for some time. I chose it because it was a bit different and thought it would go with my fabric well. I have only worn it once on a night out with some friends - none of whom could believe that I had made it! and I didn't get any photos of it on. Middlest had thought it was too trendy for her Mum, but thought it looked much better on me than she thought it would....


True Bias Hudson pants x 2
I made the first pair of these during MMM - I have worn them to lounge in and to go to the gym in. I wasn't sure about the style but having seen loads on the 'net I thought I'd give it a go. Rather than waste some fabric if I didn't like them I decided to use a pair of Husband's jersey PJ's that he no longer wears, There was just the right amount of fabric to cut out the legs from the pj legs, then I used the co-ordinating t-shirt to cut the waistband, pocket edges and the cuffs.  I really like this pair and would make them in again jersey.  The second pair - hhmmm, not so sure about these. They are also made from Husbands cast-offs - this time some Boden lounging trousers. These are woven and totally the wrong fabric - it is thickish and stiff with no drape at all. I left the cuff off. I haven't worn these once other than for photos, which probably says it all. I think in a softer drapey-er fabric they would be lovely...
jersey pair vs woven pair

Purl Bee City gym shorts x 3
My girls like to wear shorts under their school skirts. For Middlest I had whipped up a jersey pair using a pair of her leggings as a guide. That was fine, but I realised that she was also using another pair of shorts as an alternative. This was a pair of Primark's finest, quite sporty in cut and using a thin silky fabric.  I had been checking Kollabora at around the same time and seen quite a few of these City Gym Shorts which is a free pattern from Purl Soho. They looked to be pretty similar to the Primark shorts so I offered to whip some up. I used a couple of Husbands old work shirts, again if the pattern didn't work or the girls didn't like them it wouldn't be a waste of 'good fabric'. I used the Women's sizes for both girls (aged 9 and 13) and found that the pair I made for Youngest didn't fit at all. I inserted a panel between the front and back pieces and she likes this better than the original. Middlest's fit ok, but they both said that they got a bit of a wedgie at the back - but not enough to not wear them.
I then made another pair, possibly for me, out of an old White stuff skirt that no longer fitted me. I scooped out the crotch curve a bit at the back on this pair, using the Hudson Pant pattern as a guide. Eldest saw them on my sewing table and asked who they were for.  I said she could have them if she wanted and they promptly disappeared (I don't currently have a photo of this pair).

Self drafted skirt
This is again using one of the patterns drawn up in my class. I wanted a shortish linen skirt with a little kick/flip at the hem. I used a pattern for an eight panelled skirt, but mashed it together to make it four panelled. It kind of worked, but I didn't quite get the flippiness I wanted. It's close enough though. Because most of the ladies in my class are beyond 'a certain age', all the skirts that we drafted are very modest in length. To get this skirt the length I wanted, I had to take out nearly 6 inches/15cm and could probably have taken a bit more. To keep the flare, the length taken all came from the area between the bottom of the pocket and where the flare started. It sounds more complicated than it was - I basically folded out the excess and hoped for the best!. I am very pleased with it and have worn it a lot.
Linen = creases!

Sad summer
Amongst all of this I have had other things to think about - namely I was diagnosed with Breast Cancer in May. Since the diagnosis I have sentinel node biopsy as part of a research project, a lumpectomy and sentinel node removal operation including repositioning of my nipple to keep things looking nice in the future, a contrast MRI to check for signs in my other boob, and a further lumpectomy to remove cancer cells that were not removed in the first op. This is probably not the best time to be writing this as it is not even a week since the last operation and I am feeling pretty wobbly about the whole thing. The nice tidy job that was pretty much healed and looking ok, is not looking quite so tidy now. The surgeon said I will probably need some sort of reconstruction at some point, but we get the results from this op next week and then we will find out what the next stage of treatment will be. I will keep sewing as I find making stuff is important to being me. There may be more selfless sewing, although I think I am pretty good at that! I am not sure what effect the next stages of treatment are going to have on my body so I don't know what I will be sewing for me - I may just move the focus away from my top half and make a few more bottom half items - who knows.

Monday 20 July 2015

FO: sleeveless cowl #2 and a (very simple) refashion


I made this top last week to boost my summer top selection.  Whilst I have sewn a lot of tops over time (more than anything else), they mostly seem to be long sleeved/cooler weather tops.


This is another version of the MyImage Cowl neck top from the Autumn/Winter2012 magazine. I left the sleeves off again and did pretty much the same as I did for my last sleeveless version. I got a new sewing machine for Christmas (lucky me!) so everything I have made since has been with this machine.  I found a great stitch on my old machine when I did the hem on my black version, but there doesn't appear to be the same/similar stitch on my new one, so I just did a zigzag stitch.


Now that I have made this top a few times (2 long sleeved, 2 sleeveless) I find that it is a very quick and satisfactory make. I *love* the cowl neck and the way that it fits at the back. I think the back piece is marginally slimmer than the front piece, which gets rid of some of the pooling of excess fabric that I sometimes get.

I have linked to it before, but I use the tutorial from Melissa at FehrTrade for the neck line finish.

The long shorts/cropped trousers that I am wearing in these pictures were refashioned in MeMadeMay. A few years ago I bought some long tracksuit trousers that were too long. I then shortened them, but it was too much and they looked ridiculous.  I put them away to deal with later and promptly forgot all about them. In my effort to go through some of my stuff during MMM I found them again and very quickly sorted them out. I put them on, pinned roughly where I wanted to cut them and checked in the mirror before I cut them.  I used the cut-off section of each leg to create a cuff using the calf band pattern piece form the Hudson pants, and ended up with a quick pair of lounging/casual trousers.  I was a bit concerned that even with my careful checking of where I cut the legs, the finished seam attaching the cuff might be a bit irritating as it is right in the crook of my knee.

Happily, having worn these quite a few times now, they are very comfortable. The fabric is incredibly soft so the seam is not irritating at all.

Tuesday 14 July 2015

FO: Lou Box top pattern test


Back in November, Beth from Sew DIY put a call out for pattern testers for a loose fitting top that she has since released as her first pattern.

I had never done anything like pattern testing before, but decided to offer and see what happened.  I got an email a few days later saying that I was selected along with a copy of the pdf of the pattern. There was no obligation to blog about the make, which is probably a good job considering how long ago it was and my lack of blogging mojo.  I really enjoyed the make having a nice fairly drapey remnant from another garment, to use. I haven't sewn to a specific timescale before, other than my sister's wedding dress and the time frame for that was a bit longer! I made notes on my pattern, filled in the feedback form, and initially forgot to send photos of the finished garment.

Bias bound neckline

Hem and side split
The pattern is for either knits or wovens and I chose to use a woven. There were separate instructions for the different types of fabric.

I have enjoyed seeing Beth's own versions of this top and those made by other people, but am not too sure about the top on me. I think I am so used to wearing more form fitting jersey tops, that anything waftey feels a bit strange...


Given the test period was in the run up to Christmas, the photos I took make me feel cold when I look at them! It was quite an overcast day, and pretty chilly in my kitchen.

The top would have been quite useful in the recent hot spell we have experienced in the UK, but being unsure of the style on me, means that I haven't actually worn it yet.  Having looked at the photos I took whilst writing this post, I think it is the fit of the jeans I should be more concerned with - talk about about a saggy bottom!


Beth has since released her Lou Box Top pattern and has just recently asked for testers for a second pattern, although I think the test period is nearly over. I would happily do pattern testing again on this experience, but  can't commit to anything like that at the moment - but give it a go if you can!

Monday 13 July 2015

FO: Kirsten Kimono Tee Hack


I have been following Aleah from no time to sew for a while now and really like alot of her makes.  A while ago (I just checked, it was almost exactly a year ago) she posted about a Kirsten Kimono colour block hack that she had made, inspired by a Boden top she had seen. The Boden top isn't available any more, but I remembered having seen the same top top and thinking it would be easy to do.

The Kirsten Kimono top pattern is free when you sign up to Maria Denmark's newsletter and I have used it before for me and Eldest. I made a size XS this time as I have lost some weight since I made the last one. Maria describes the top as having negative ease at the bust which mine definitely didn't have, but I think that was partly that my fabric was very drapey.  I had a bit of a brain freeze when cutting this out and it took me ages to work out where to cut for the colour block yoke. Aleah used the paper joint on the printed out pattern but I made my yoke section a fraction deeper, then I added a seam allowance.

This whole top was free, as not only was the pattern free, but I used navy jersey that I got at a fabric swap a couple of years ago, and the stripy fabric was a t-shirt of Youngest's.

 She grew out of it before she had much chance to wear it, so it was in pretty good nick.

Youngest aged around 4

I have made other things from the navy fabric so had a bit of a puzzle getting the main pieces of the tee cut out - I ended up having a seam at the centre front, but as I had to have a seam at the centre front of the yoke I thought it could be a design feature!

Centre seams on the front


I did not use the neck binding - I put it on, then took it off again. I much prefer the neckline on this top without the binding. I overlocked all the edges then used my lovely wonder tape (it sticks fabric together then washes away!) to do the neck, arms and hem. The wonder tape that I have is the perfect width for turning under for a narrow hem, but it does mean that you need to wash the item before you can wear it.

Having worn it a few times during MMMay15 I think it is a fraction too small - I made XS but I am pretty sure that I forgot to add seam allowances to the side seams which would make it even smaller! It is only noticable where the top sits on my hips and the hem rolls up a little, but it is not enough to make it unwearable.

relaxing!
This is another of my catching up posts, I think I only have a few more garments to go then I will be up to date!

Friday 12 June 2015

FO: Burda Raglan top 2/2013 #127, again!

How many times have you made one pattern? This pattern is my most used pattern - I used it for OWOP (One Week One Pattern) last year. I have made 2 long sleeve versions, a short sleeve one, a short sleeve dress length version and now this one.

I bought the fabric from Geoff Rosenberg at Trumpingtion Village Hall a few months ago.
The fabric in the middle

It is a John Kaldor Jersey so good quality, but it is 100% man made fibre and feels like it is a bit clammy when I first put it on.  Apart from that I really like it. It is quite stretchy and the arms are designed to be extra long, but in this fabric they were comedy long. I cut some of the length off and maybe took a fraction too much off, but not enough to be irritating, thankfully.

It is quite hard to take pictures of the fabric as the pattern makes it seem out of focus.
I think this one is in focus!

sleeve gathers - my favourite part of this pattern
This is the fifth time I have made this top so I didn't really use the instructions. I wore it several times during MMMay15.


I am trying out larger photos today - what do you think?


Wednesday 10 June 2015

FO: Coral Bronte Top

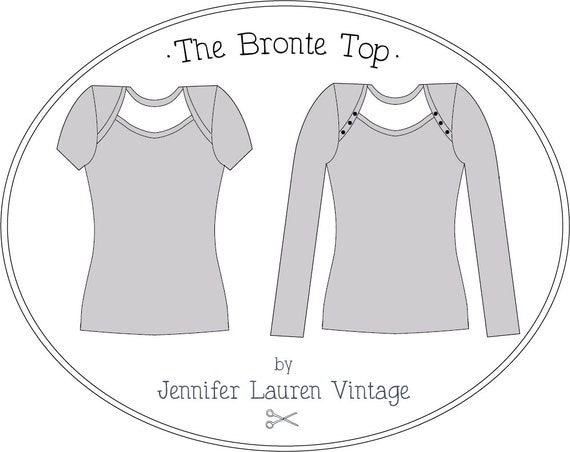
Bronte Knit Top Ladies PDF Sewing Pattern Multi Size 6 to 24


Still catching up with unblogged makes!

This pattern has been around for a while and I eventually bought it as part of a Pattern Bundle last summer, along with the True Bias Hudson Pants and the Mouse House Creations Julia Cardigan amongst others.

I hadn't been that taken with the Bronte top when it first came out, but as ever, once other people's versions start popping up on the internet I began to warm to it.  I realise now that my top is almost the same as one of the ones Jennifer made for her pattern photos.

Around the same time, I was re-watching the series Castle with my two older girls and had noticed that the female lead, Kate Beckett, had a top that she wore (I think in series 3) that had a similar neckline. She had a couple of these in different colours:


Beckett's top is in a much stretchier fabric and the back neck is much higher. An idea began to form....

The fabric for this came from one of my first visits to Goldhawk Road and my intention was to make a copy of a summer top that I had. That never happened, and the fabric would have been too thick for that particular top any way.

I cut the top out in a single layer in order to get all the pieces on the fabric, at which point I nearly had a disaster. I had pinned along the centre back with a view to flipping the pattern piece over and cutting the other side... and I started cutting up the centre back..... I tried to rescue it by zig-zagging the cut bit together, but it didn't really work

Fortunately I had added extra length to the top and I ended up just sacrificing that extra length without compromising the top, phew! I also added a band at the bottom to add back some of the length that I lost.

It's a while since I made this top, but seemed pretty straight forward.  There is a lot of information in the instructions about working with knits and how to choose the best type of knit for this pattern. I think that my fabric is just on the limit of suitable.  My machine struggled with the thickness of sewing through multiple layers of binding when attaching the sleeves. I overlocked the armhole seams after sewing with a narrow zigzag, but I ended up unpicking the overlocking as it made the seam quite stiff and uncomfortable and really noticeable on the outside. The knit is pretty stable so I didn't bother trying to finish any of the other seams.

Unusually I haven't got any 'hanger shots' for detail, but here are a couple of different shots of me wearing it - the one with the skirt was taken not long after I made it in January, and the other photo is from my Me-Made-May photos.